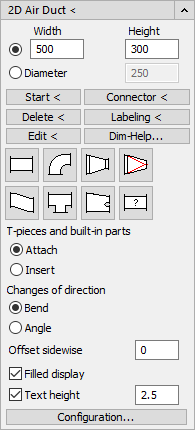
Details on Duct <(2D Air Duct)
Information about the Air duct< section under Air duct.
In this section you will find all drawing and editing commands as well as all important settings for drawing rectangular and round ducts.
You are here:
Rectangular duct, Round pipe duct
Rectangular duct
Select the first radio button to draw a rectangular duct and adjust the Width and Height dimensions if necessary.
Round pipe duct
Select the second radio button to draw a round pipe duct and adjust the Diameter if necessary.
Drawing commands, Editing commands, Dim-Help...
| Command | Description |
|---|---|
| Start < | To draw first duct components of a pipe run, it is necessary to specify a starting point and a direction. This command allows you to restart drawing if, for example, you have finished drawing a pipe run and want to draw another pipe run. |
| Connector < | This command can be used to continue drawing on existing duct components. Simply select a flange or a connection edge and the program will set the starting point, the constructing direction and the correct layer. |
| Delete < | You can use this command to remove inserted T-pieces or built-in parts, for example. The duct can then be reset to the correct section length. |
| Labeling < | This command can be used for subsequent labeling. In some cases it may be useful not to have everything labeled directly during the drawing process (checkbox Text height deactivated) and to place labels only selectively at appropriate places later. Use this option for these cases. |
| Edit < | Allows you to subsequently edit installed mounting parts (components), e.g. with regard to length and width. The program automatically updates the component and the ducts or transitions. |
| Dim-Help... | Opens the Dimensioning dialog where you can calculate the dimensions, the velocity and the volume flow in relation to each other. |
Available components - Rectangular duct
Depending on whether you draw a rectangular or round duct, the names and representations of the buttons and the names of the subsequent dialogs vary. In the following, the components are explained on the basis of the buttons, designations and names of the subsequent dialogs for rectangular ducts.
| Component | Description |
|---|---|
| | After you have set a starting point or selected a connection of a duct section, you can draw straight duct runs with this component. |
| | Opens the Bend/Elbow dialog where you can specify the dimensioning of the component and the construction direction. |
| | Opens the Transition dialog where you can specify the dimensioning of the component and the construction direction. |
| | Opens the Transition to round dialog where you can specify the dimensioning of the component and the construction direction. |
| | Opens the Swan neck dialog where you can specify the dimensioning of the component and the construction direction. |
| | Opens the T-piece dialog where you can specify the dimensioning of the component and the construction direction. |
| | Opens the Y-piece dialog where you can specify the dimensioning of the component and the construction direction. |
| | Opens the Built-in parts dialog where you can specify the dimensioning of the component and the construction direction. The selection includes, for example, fire dampers, filters, air grilles, sound absorbers and fans. |

 /
/


Available components - Round pipe duct
Depending on whether you draw a rectangular or round duct, the names and representations of the buttons and the names of the subsequent dialogs vary. In the following, the components are explained on the basis of the buttons, designations and names of the subsequent dialogs for round ducts.
| Component | Description |
|---|---|
| | After you have set a starting point or selected a connection of a duct section, you can draw straight duct runs with this component. |
| | Opens the Bend, round/Elbow, round dialog where you can specify the dimensioning of the component and the construction direction. |
| | Opens the Transition, round dialog where you can specify the dimensioning of the component and the construction direction. |
| | Opens the Transition to square dialog where you can specify the dimensioning of the component and the construction direction. |
| | Opens the Offset dialog where you can specify the dimensioning of the component and the construction direction. |
| | Opens the Branch dialog where you can specify the dimensioning of the component and the construction direction. |
| | Command to draw flexible pipes. |
| | Opens the Built-in parts dialog where you can specify the dimensioning of the component and the construction direction. The selection includes, for example, fire dampers, filters, air grilles, sound absorbers and fans. |

 /
/


Further settings, Configuration...
T-pieces and built-in parts
Determines whether T-pieces and built-in parts are to be attached or installed.
Attach: The selected component will be attached to the last component created or treated with the Connector < command.
Insert: With this option, you can select a duct section in which the component is to be installed.
Changes of direction
Specifies whether changes of direction are drawn as angles or bends.
lateral Offset
Allows you to specify a lateral offset. The duct is then drawn with this distance to the guide line. For example, you can follow the course of a wall and the duct is drawn in at the specified distance from the wall.
Filled display
Defines whether the ducts are displayed filled or not. If you have drawn ducts with filled display and switch off the filling, all ducts will be displayed unfilled. On the other hand, however, unfilled ducts cannot be subsequently displayed with a fill.
Text height
Determines whether the duct should be labeled with the dimension immediately when drawing or not. The input field next to the checkbox determines the text height. The labeling cannot be switched on - or off subsequently , but always applies to newly drawn ducts.
Configuration...
Opens the Duct configuration dialog where you can define basic settings for drawing rectangular and round ducts.