Details on Pipline corridor
Information on Pipeline corridor < under Piping.
The availability of the described commands for drawing in, connecting and configuring pipes may vary depending on the trade and planning type.
You are here:
Pipeline corridor
Use this command to draw several parallel pipes at the same time. The distances and media of the pipes are adjustable. This command depends on the selected wizard. With a 3D wizard you can also construct a 3-dimensional pipeline corridor.
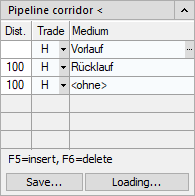
Pipeline corridor <: Click this button to draw the pipeline corridor according to the settings.
Dist.: In this column you enter the distance to the previous pipe or to the crosshairs (first line) in drawing units.
Trade: Use this drop-down list to select the trade for which you want to draw the pipeline corridor:
| Abbreviation trade | Trade |
|---|---|
| F | Fire protection |
| E | Electric |
| G | Gas |
| H | Heating |
| C | Cooling |
| L | Ventilation |
| S | Sanitary |
Medium: After clicking in the field for the medium, you can use button to  to select the medium for the set trade.
Save: Saves the set data from the table.
Load: This button loads the data of a saved table into the pipeline corridor command.
Options for drawing pipeline corridors
When drawing the pipeline corridor, the following options are available in AutoCAD:
Andere Seite: Selecting the Other side changes the side on which the media from the pipeline corridor definition is drawn.
If the Other side option is selected after determining the first point of the pipeline corridor in the drawing, the media from the pipeline corridor table will be created on the other side of this point respectively (inverted).
Slope: Selecting the Slope option allows you to enter a slope in %, which will then be added to the pipeline corridor.
Incline: Selecting the Incline option allows you to enter an angle at which the pipeline corridor will then rise or fall.
Rotate: Selecting the Rotate option rotates the coordinate plane by an angle to be determined, so that you can follow sloping walls, for example.
Height: Selecting the Height option will show the table of storeys so that you can choose a new construction height. An ascending pipe-run is automatically drawn up to the new design height. From there, the drawing continues horizontally.