Details on Rigid connection
Information on the Rigid connection command under Piping.
The availability of the described commands for drawing in, connecting and configuring pipes may vary depending on the trade and planning type.
You are here:
Rigid connection (Automatic)
After starting the command, click the symbol to be attached. It is connected directly to the nearest pipes at a right angle. There is no need to select the medium (pipe systems), provided that the symbol contains the appropriate attributes. If the object is to be connected to other pipes (upwards or downwards or laterally to a pipe run), select the alternative pipes in the current command. The connection is established directly. If a symbol should be the last object, or certain media should not be connected, simply click on the superfluous pipes to have them removed.
The Rigid connection command can also be used to connect several objects at the same time. You can select the objects individually or with the selection rectangle. To connect all objects at once, first select all objects and then start the Rigid connection command. If you want to change the connections afterwards, start the command again, select the object to be changed and then the alternative pipes.
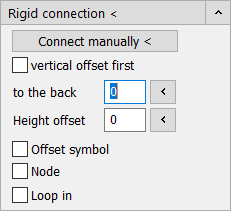
Automatic Rigid connection works in schematic drawings, in floor plan and in 3D drawings. Options like Vertical offset, to the back or Height offset can be used as usual. If a binding situation cannot be solved with the automatic Rigid connection, use the function Connect manually <, where you select the pipes individually.
When connecting waste water components, the position of the mouse click when selecting the object determines in which direction the chamfer is drawn. If the object is clicked on the left, the chamfer follows this direction.