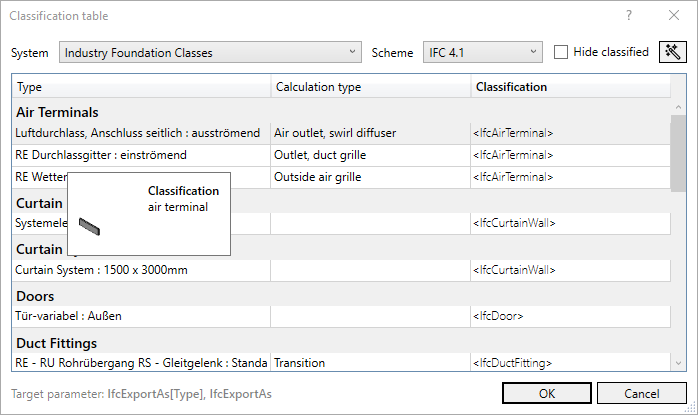
Details on the Classification Table Dialog
Information about the Classification table dialog.
Lists the components of the current selection or the section of the model currently displayed and allows the assignment of values to a classification parameter.
You are here:
System, scheme
Drop-down list for selecting the classification systems. The systems Industry Foundation Classes and Cost groups are pre-installed and are always available in the list. For each system you can choose from different schemes. You can also create custom systems.
Industry Foundation Classes
This classification system allows you to classify component types in order to prepare them for IFC export or to make a finer differentiation of existing component types. All classifications are performed in the type parameter mode - all copies of a component type in the model will have the assigned classification. For this reason, the components are sorted by category. You can choose between the schemes IFC 4.1 and IFC 2x3 TC1.
Cost groups
In this classification system, you can use the parameters of the component copies to assign a cost group to individual components. The components are sorted by system in the view. You can choose between the schemes DIN 276-1 (2018-12), DIN 276 (2018-12), SN 506 511 (2012-en), SN 506 511 (2020-en) and ÖNORM B 1801-1 (2021-02).
Hide classified
Activated: Already classified components are not displayed any more.
Deactivated: All components of the selection or the displayed model section are displayed.
Make suggestions
 Generates classification suggestions based on the internal calculation types. Here, all components of a calculation type are assigned the same stored value. Suggestions are always generated for all elements that have a calculation type assigned to them with associated classification parameters. Before you write classifications of the suggestion generation to the model, you should check the classifications for their correctness. For classification systems without allocation tables (mapping.xlsx), the button is hidden.
Table of model elements
By selecting the desired lines and opening the context menu with a right mouse-click, you can edit multiple entries at once. Via the context menu you can open the Select classification dialog, where you can select parameters from the catalog of the classification system or reset the selection to the default setting.
Hold the cursor over the line of a component to display a preview and the classification of the component.
| Column | Description |
|---|---|
| Type | Shows the component type of a component. |
| Quantity (for classification with parameter of copy) | Number of copies of the respective part in the current view or selection. |
| Category (for classification with parameter of copy) | Revit category of the selected component. |
| Calculation type | Classification of component in the LINEAR pipe network calculation. This internal allocation is the basis for generating a proposal. The allocation of computation types to components is stored in the mapping file and can be adapted there. |
| Classification | Displays the values of the classification parameter, which are written to the component or component type after the dialog is confirmed. You can enter the value either manually or select it from the catalog of the classification system in the Select classification dialog. Assigned values are displayed in bold. Parameters in angle brackets are written to the component, as long as no other parameter is assigned. Should an assigned parameter not match the catalog of the classification scheme, this will be displayed by an exclamation mark in a red triangle. |
 Opens the Select classification dialog, where you can select parameters from the catalog of the classification system. The currently selected parameter is displayed in the footer of the dialog.
Clicking OK closes the dialog and the corresponding parameters are written to all selected types or copies.