Details on Tank Configuration
Information about the Base body tab in the Tank configuration under Pipes.
In the Tank configuration dialog you can configure, save and insert tanks for different Trades into the drawing.
You are here:

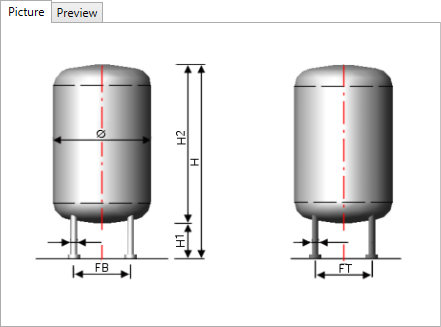
Enter the dimensions of the tank and the feet in the right part of the dialog. The references to the dimensions can be seen in the exemplary illustrations. If you want to check the effects of an entry, click on Preview.
Tabs: Base body, Ports on body, Ports on bottom, Ports on top
On these tabs you define the base body and the ports of the tank.
Tank type, Building type
Select the shape and orientation of the tank. You can get a view of the different shapes and building types under Preview.
For the Round tank tank type, the feet are arranged radially.
For the Rectangular tank tank type, the feet are arranged in a rectangular grid. The number and distance of the feet can be entered in the respective fields.
Tank pressure
Select a pressure rating from the drop-down list or enter the value in Pascal in the field on the right.
Description
By entering a name, you can name the family of the tank. The description is stored with the tank data and is used to distinguish between several tanks.
Dimension sheet
Shows a finished, dimensioned tank to illustrate the dimensions.
Preview
The preview shows a 3D model of the tank according to the dimensions you specified. A 3D model to scale is created in the preview window and updated when the inputs are changed. You can rotate the model by grabbing it at any position with the left mouse button pressed and moving the mouse. You can zoom in or out on the model in the preview with the mouse wheel. If you keep the mouse wheel pressed, you can move the view of the model.
The view in the preview can also be controlled using the buttons to the right of the window. The viewing side that you can set using the buttons is marked in dark blue on the button icon.
Material body, cover, bottom
Use the drop-down lists to select the material for these components of the container.
Nominal diameter
Use the drop-down lists to define the nominal diameter of the tank.
Height above ground [H1] / [H], Tank height [H2], Total height [H], Tank length [L]
Lateral view: The height above ground [H1], the tank height [H2] and the total height [H] are used for the vertical version. The height above ground [H] and the tank length [L] are used for the horizontal version.
Foot type
For the Round foot shape, enter the diameter in the Foot dimension field .
For the Four corner shaft shape, enter the width and depth in the Foot dimension fields.
Quantity of feet, Distance between feet
The feet for round tanks can be arranged radially or in a rectangular grid. In the case of square tanks, the feet are arranged in a grid.
| Tank round, vertical, odd number of feet | Tank round, vertical, even number of feet | Tank four corner shaft, even number of feet |
|---|---|---|
 |  |  |
| The feet are arranged radially. In a radial arrangement, field B is used for the distance between the feet. The distance is measured from the axis of the tank to the axis of the foot. | The feet are arranged in a rectangular grid. When arranging in the grid, you define the number and distance of the feet in the directions B and T. | The feet are arranged in a rectangular grid. When arranging in the grid, you define the number and distance of the feet in the directions B and T. |
Foot dimension
For the Round foot shape, enter the diameter in the Foot dimension field .
For the Four corner shaft foot shape, enter the Wwidth and d depth in the foot dimension fields.
New, Load, Save
New
Creates a new tank if you have previously loaded a tank or changed settings.
Save
Saves the current tank configuration.
Load
Loads a previously saved tank configuration.
Draw <
The family is loaded into the project and you can place the component in the drawing.
Edit
If you have previously shown the data of a tank in the Tank dialog using Get and have changed the family, all instances of this family contained in the project are changed using Edit.
Get <
If there is already a tank family in in the drawing, all data of the tank is displayed in the Tank dialog by clicking Get. You can adjust the data and save the changed tank family or transfer the changes to all instances of this family contained in the project by clicking Edit.
Close
Closes the Tank configuration dialog. The entered data is saved in the dialog until you close the program. The data is also available in other projects.