Adjust Parameters for Labeling of Components with Calculation Data
Shows step-by-step how to customize the labels for a calculated pipe or duct network in the Configure labeling parameters dialog.
Before you begin
After calculating your pipe or duct network, you would like to label the components with the calculation and component data and customize the labels for this purpose.
Requirements:
You have successfully performed the Pipe and Duct Network Calculation.
Navigate to:
Procedure
- Open the Labeling dialog via the Labeling button.
- In the Configure label section, locate the line containing the network object for which you would like to customize the label.
- Click the button
 in the Label left or Label right column and select the <create automatically> entry in the drop-down list.
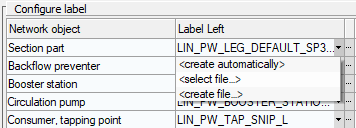
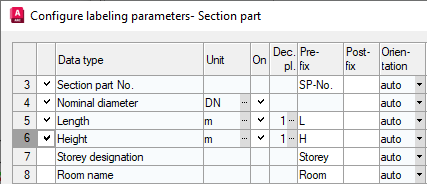
- Click the
 button to open the Configure labeling parameters dialog.
 - In the first column, check the boxes for the data types that should be output in the label. Note: With one click in the column header you can set all check marks at once. Another click removes all check marks and a third click restores the default setting.
- Close the dialog with OK.
Results
You have changed the label for the selected network object. If you now start the labeling function, the changed label will be used.
Note: If necessary, make the same settings for the relevant network object in the Label left or Label right column.