Details about Element Classes and Property Sets
Information about the Element classes and property sets dialog.
The dialog consists of a static and a dynamic area. The Element classes and Property sets panes are static, while the right part of the dialog displays content dynamically depending on the selection in the static pane. The size of the areas can be adjusted by dragging them with the mouse.
You are here:

Element classes
Lists all available element classes incl. all user-defined element classes created in the current project. The order of the entries can be adjusted with drag-and-drop.
 New element class: Creates a new element class that can subsequently be configured as desired.
 Duplicate element class: Copies the currently selected element class with the filter rules, but without assigning the property sets.
 Delete element class: Deletes the currently selected element class. If the element class uses property sets, these can also be deleted in a query if required. Default element classes can also be deleted, but will be restored when clicking on
  Default values.
Settings for Element Classes
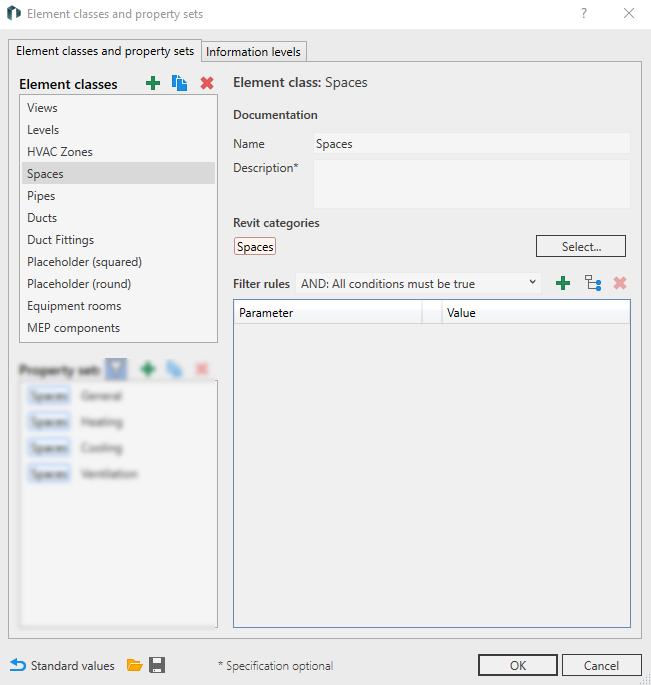
In the Documentation area you can specify the Name and a Description for the element class. The description is optional and has no effect on the function. The name of the element class is relevant in the link to property sets and in the selection of the display in the properties dialog.
In the section Revit categories, you can decide which Revit categories to use after clicking Select .... An element only belongs to a class if its Revit category corresponds to one of those selected here.
In the section Filter rules, the selection of the desired elements of this element class can be specified in two further filter levels. The defined rules can be linked in the drop-down list via AND or OR.
Click to open the Select parameter: dialog [...], in which you can select a parameter. The selected parameter can then be narrowed down with regard to its value. An element only belongs to a class if it contains the selected parameter in the defined value range.
Clicking on  opens the Select system dialog, where after selecting the system a classification can be chosen from the available classification schemes. An element belongs to a class only if its classification corresponds to the one selected here.
Clicking deletes the currently selected filter rule.
All selected rules are listed in the table. Here you can refine the filter rule.
Property sets
Lists all available property sets (filtered; for the selected element class). The order of the entries can be adjusted with drag-and-drop.
 Only show property sets for selected element class: Hides all property sets that are not associated with the selected element class.
New property set: Creates a new property set that can subsequently be configured as desired.
Duplicate property set: Copies the currently selected property set with all its properties.
Delete property set: Deletes the currently selected property set. You can also delete default property sets. Clicking Default values also restores default property sets.
Settings for property sets

In the section Documentation you can specify the Name and a Description for the property set. The description is optional and has no effect on the function. The name of the property set is used in the Properties dialog as a header for grouping when an element is selected.
In the Scope of application section, link the property set to at least one element class after clicking on Select in the Select element classes dialog. When an element is selected in the model that meets the criteria of a linked element class, the properties defined here are read out and displayed in the Properties dialog.
In the Properties section, by clicking on in the dialog Select parameter: : [...] you can select a parameter whose value is to be displayed when a corresponding element is selected in the properties.
All selected parameters are listed in the properties table. The table offers the following options:
Parameters
Plain name of the selected parameter. This field cannot be edited.
Display name
Display name of the selected parameter. When a matching element is selected, this name is displayed in the properties dialog. This field can be edited. The display name is optional and can be omitted, the field remains empty in the properties dialog in such cases.
Description
Description of the parameter, which is already existent for standard parameters. The specification is optional and can be edited.
LOI
Optional Level of Information (level of information of the construction elements of a planning model depending on the project phase). This specification is currently only for documentary purposes.
Restrictions
Click  to open the Restrictions: dialog [...], in which you can define valid values and value ranges.
ReadOnly
Enabled: The value is only displayed in the properties and can not be edited.
Required
Enabled: If the parameter for a selected element is not filled, the value field is marked accordingly.
Disabled: The parameter can be empty.
Preference when creating
Dropdown list for selecting parameter binding in case a parameter does not yet exist at the selected element. This option is available for shared parameters as well as for (shared) LINEAR parameters. The parameter can be created with different binding preferences:
Project (Instance): The parameter is created for each placed instance of a component from this category. The parameter value per instance can be different.
Project (type): The parameter is created for the underlying category. All instances of this category get the same parameter value.
Family (Instance): The parameter is created for each placed instance of this family. The parameter value per instance can be different.
Family (type): The parameter is created in the underlying family. All instances of this family get the same parameter value.