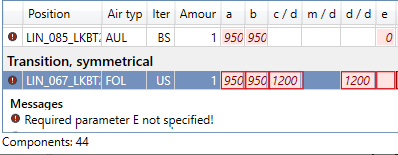
The parameter of an air duct component is not specified
Problem
When creating the parts list for the e-klimaX export, the message Required parameter X not specified is output for an item.
Cause
The shared parameters are not set. This means that the parameters of the components cannot be assigned.
Solution
Procedure
- Open the Revit dialog Edit Shared Parameters under .
- Check if the parameter file LINEARSharedParams.txt is set under Shared parameter file:. If not, click Browse... and open the file. The path to the file can be found in the LINEAR user interface under .
Cause
The parameter value is present in the component or in the component family, but not assigned to the LINEAR parameter retrieved by the eklimaX export. The parameters needed for an evaluation could not be identified. Therefore, a complete and error-free export of the corresponding fitting families to e-klimaX is not possible.
This message is returned for parts that have not been explicitly approved by LINEAR for e-klimaX export.
Solution
Note: Always match the component parameters with those in e-klimaX during post-processing to ensure error-free assignment!
Procedure
- Use relevant component in the Parts list e-klimaX dialog and use the
 Select corresponding components in project function to display the component in the model.
 - Double-click the part to open the Family Editor.
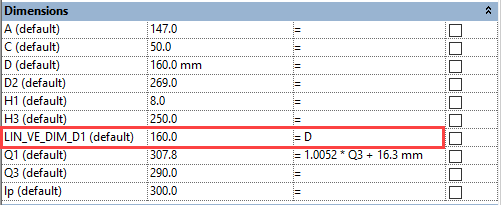
- In the Revit ribbon, choose to open the Family Types dialog.
- In the Dimensions section of the table, find the desired component parameter, e.g. d1. The parameter is usually assigned a fixed value or formula.
- Click in the table and create a new entry using the
 New Parameter button at the bottom left of the dialog. The Parameter Properties dialog opens.
 - In the Parameter Type area, select the Shared parameter option.
- Click on the Select ... button. The Shared Parameters dialog opens.
- In the Parameter group drop-down list, select the liNear_Ventilation entry.
- Select the desired Parameter (e.g. LIN_VE_DIM_D1) and confirm with OK. The suffix of the parameter name stands for the component parameter to be assigned, in this case for the parameter d1.
- In the Parameter data area, select the Instance option and confirm it with OK.
- For the newly created parameter, enter the corresponding part family parameter in the Formula column field to perform the mapping.
- Confirm the entries by clicking the Apply button. Exit the dialog by clicking OK.
- In the Revit ribbon, in the Family Editor area, click the Load into Project button.
- Revit asks whether the existing version should be overwritten. Select the option Overwrite the existing version and its parameter values.
- Call the e-klimaX export function again and check the corrected position.
Note: If you have not assigned the correct parameter, repeat the steps and, if necessary, delete the previously assigned parameter in the Family Types dialog using the Delete Parameter button.