Details on the Table of Storeys
Information about the Table of storeys dialog in context of the Shift to storey height command.
When using the Shift to storey height < command, you specify the desired height for shifting in the Table of storeys dialog. This is done by selecting the storey to be shifted to, by specifying a reference edge and, if necessary, by specifying an offset.
You are here:
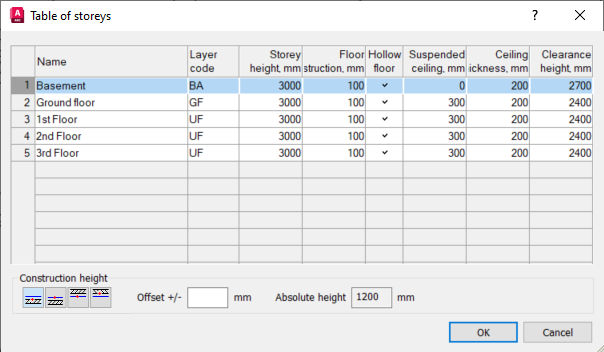
Table of storeys
Specifies the storey to which the objects will be shifted. Proposed is the storey where the second reference point was selected for shifting.
Construction height
In the Construction height section you define the height for placing objects within the selected storey. Therefore, define the reference edge to be used in the storey and, if necessary, an offset. The absolute height field shows you the actual height by which the objects will be shifted.
Reference edge
- Reference level unfinished floor
- Reference level floor construction
- Reference level suspended ceiling
- Reference level unfinished ceiling
Offset
If necessary, specify a positive or negative offset that will be considered when shifting.
absolute height
Displays the actual height by which the objects are shifted. The absolute height results from the choice of storey, the reference edge selected and the offset specified, if any.