Details on Assign Item Numbers
Information about the Assign item numbers dialog under Dimensioning/Label.
Allows you to adjust the settings to assign item numbers, as well as to assign the item numbers. You can assign item numbers to all components. After closing the dialog, the item numbers are no longer displayed. However, they are still internally assigned to the components and available for labeling.
You are here:
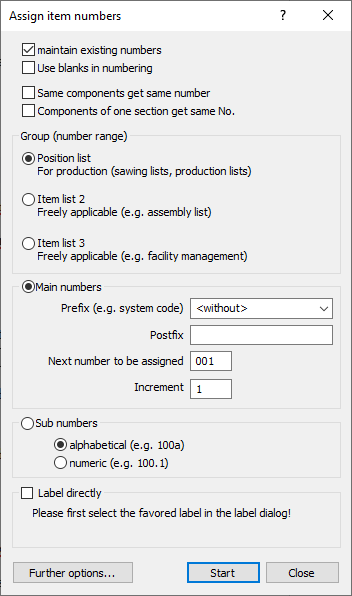
maintain existing numbers
Activated: When selecting parts with existing item numbers, the previously assigned item numbers are maintained.
Deactivated: When selecting components with existing item numbers, the previously assigned item numbers are overwritten with the number currently being assigned in the numbering process.
Use blanks in numbering
Existing numbering of components may have gaps, e.g. due to a preceding numbering with an increment greater than 1 or if components have been deleted. Activate this function before you start the numbering again.
Activated: During numbering, existing gaps are filled first before numbering continues at the end of the already existing numbering.
Deactivated: Gaps in the numbering are not taken into account and the numbering is continued at the end of the already existing numbering.
Same components get same number
Identical components are, for example, valves or bends of the same type with the same technical values.
Activated: Identical components are given the same item number in the numbering. This is useful for a legend, for example.
Deactivated: Identical components are not given the same item number in the numbering. The number that is currently to be assigned in the numbering process is always assigned, even if there is an identical, already numbered component in the drawing.
Components of one section get same No.: If this function is activated, proceed as follows: Use the left mouse button to click on all the components that you want to assign to a section. Press the right mouse button to stop numbering a section. Then use the left mouse button to click on the components that you want to assign to another section, and so on. All components of a section get the same number.
Activated: All parts that are selected during numbering receive the same number and are combined into one section after ending numbering with the right mouse button. Start the numbering again to select the components of the next section.
Group (number range)
Allows the use of up to three labeling groups. Each labeling group has its own number range, so that in each of the 3 groups the numbering can start at 1, for example, and equal numbers can be assigned.
Main numbers
Prefix (e.g. System abbrev.), Postfix
Enter the text that is to be placed before or after after each item number.
Next number to be assigned
Displays the number that will be assigned next and allows you to specify with which number the numbering should begin or continue.
Increment
Use 10, for example, if you want to number components in steps of 10.
Sub numbers
Allows you to use alphabetical and numerical sub-numbers. You can specify the main number used in numbering in the Next number to be assigned field.
Label directly
Activated: When assigning numbers, the components are directly labeled as well, provided that the component supplies data for the labeler. Make sure that the desired label is selected.
Further options...
Opens a menu with the following options for resetting position numbers:
Reset position numbers
Allows to remove individual item numbers by selecting parts in the drawing.
Reset all with prefix “(...)”
Allows to remove all position numbers with a specific prefix. By default, the last used prefix is offered. If you want to remove the numbers of another prefix, select the corresponding prefix from the Prefix (e.g. System abbrev.) drop-down list in the Main numbers area. After executing the command, the numbers remain visible until a new numbering is started or a numbering is continued or the dialog is closed.
Reset labeling group (...)
Allows you to remove item numbers of entire labeling groups. By default, the last used labeling group is proposed for reset. If you want to remove the numbers of another labeling group, select the corresponding Item list in the Group (number range) area. After executing the command, the numbers remain visible until a new numbering is started or a numbering is continued or the dialog is closed.
Start
| Selection mode | Description |
|---|---|
| S (Single) | Click on a single component to select it. |
| P (Path) | Select a start component and then an end component to select these parts and all the parts in between on the path. |
| N (Network) | Select a start component and then a component in the direction of the network side you want to mark. This allows you to select pipe and duct networks from a component to the start or end of the network. The additional option search in all directions allows you to select the entire network after selecting a component. |
Close
Exits the function and closes the dialog. If the dialog is closed, the position numbers are no longer displayed. However, the item numbers are still internally assigned to the components and available for labeling.