Details on Component Lists
Information about the dialog Component lists.
Component lists process component data for displaying and outputting the data in tabular form, for directly supplementing/modifying the data and for exporting/importing the data using Excel for external supplementation or modification. By importing you can, for example, import room log books into building models.
You are here:
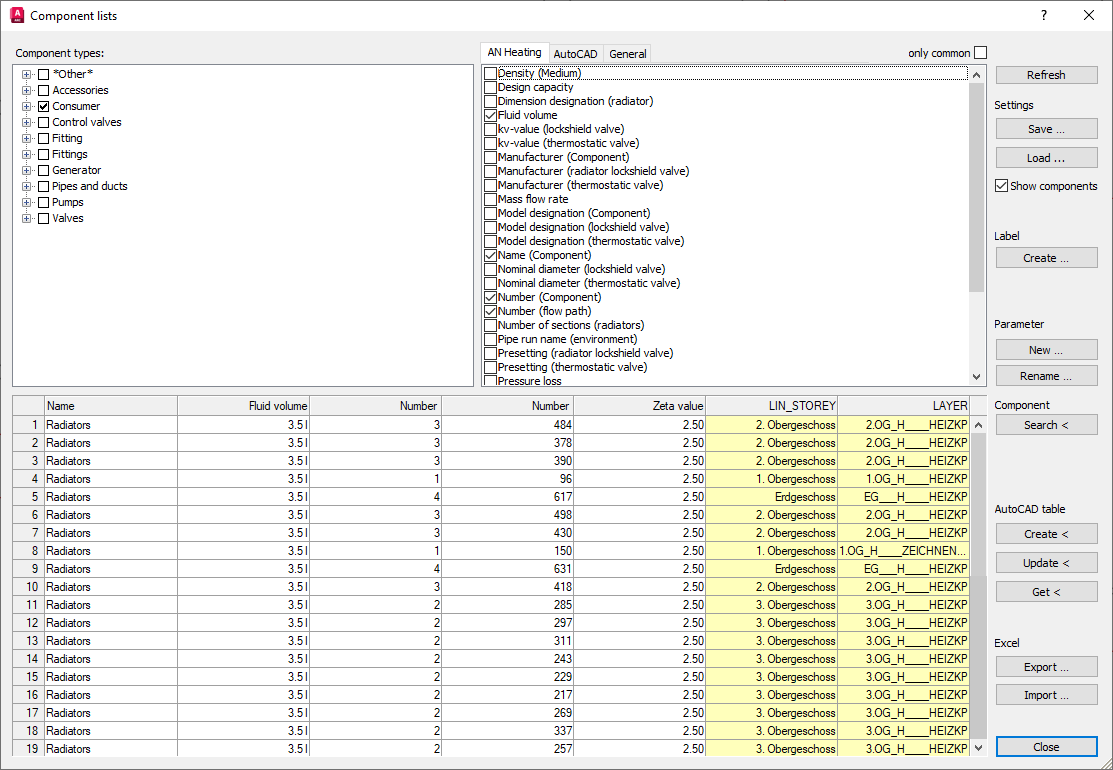
Component types
Lists the component types of all components visible in the current view (model or layout) and allows you to select them by enabling the corresponding checkbox. If you enable or disable storeys or trades in your project, for example, you can use the Update button to update the list of component types visible in the view.
The basis for displaying the component types are the classifications assigned to the components. Exceptions are the component types under Pipes and Ducts and other non-classifiable contents such as AutoCAD blocks and base elements. These are listed under the component type *Other*. If your drawing contains further unclassified elements, these are also listed under the component type *Other*.
The parameters of the enabled component types are displayed in the window to the right of the Component types area, sorted on different tabs. Enable the Show components checkbox to display all parts of a selected component type in the drawing. If required, you can edit the components displayed in the drawing and thus selected with further commands such as Classify < or the commands of the Material Data area.
Tabs: AN Heating, General, AutoCAD, Custom etc.
On the different tabs the available parameters of the enabled component types are listed. Enable the checkbox of a parameter to add the parameter as a column to the component list. The sorting of the parameters into the different tabs is based on the origin of the data. For example, if the data originates from the pipe network calculation of a heating network, it will be listed on the AN Heating tab.
Use the Rename ... button to adjust the name of the selected parameter. When adjusting parameter names of certain tabs (e.g. AN (...) and General), the new names are visible only in the column names of the components list and not in the name on the tab. If you have already copied the parameter to the component list before the adjustment, you can copy the new designation to the component list using the Update button. If you have opened the Components lists dialog before a calculation and have performed a calculation afterwards, you can use the Update button to transfer the data newly written by the calculation into the dialog. The parameters created by the calculation are then listed on a newly added tab (AN (...)).
Use the New ... button to add further parameters. Newly added parameters are directly added to the component list and, as soon as a value is assigned to them, are listed on the Custom tab. Alternatively, you can use the Excel export and import to add new parameters by adding columns in Excel.
only common
Enabled: Only parameters that are present in all enabled component types are displayed.
Disabled: All parameters of the enabled part types are displayed.
Component list
The component list displays the parameters enabled on the tabs in columns. The rows represent the individual components of the enabled component types, unless the list data has been edited/combined.
Modifying existing component data - white and yellow component data fields
Component data can be displayed against a white and against a yellow background. You can overwrite white fields without losing the original value, as it is preserved in the background and still used for its original purpose. Changed values of white fields are displayed in bold. Delete the entered value and exit the field to restore the original value. When overwriting white fields, the newly entered value is only used for documentation and output purposes. If, for example, you change the nominal width of a pipe section, the changed nominal width is used in labels, AutoCAD tables, exported Excel workbooks, etc. However, the original value from the calculation is not changed. The pipe section is still considered in the calculation with its original nominal width.
In yellow fields, however, you change the original value. If, for example, you assign a different layer to a component, this component will actually be moved to the layer in the project. This direct link to the original values was previously implemented for block attributes, layers and layer components.
Edit component lists
Right-clicking a column header opens a context menu that allows you to edit the respective column or the entire component list (Filter data..., Merge data...). Columns that have been sorted, filtered and/or summed up are marked with an asterisk (*) in the column header.
Context menu
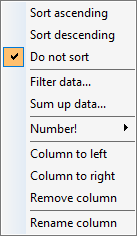
Sort ascending, Sort descending, No sorting
Defines whether and how the column is sorted. You can also sort by several parameters. The order in which you sort the individual columns is decisive.
Filter data...
Opens a context menu where you can filter by the values of the parameter.
Sum up data...
Sums up components with the same value and outputs the number in a new column. You can also create component lists that combine the data of several columns. The order in which you sort the individual columns is decisive.
Number!
Numbers the column according to the selected increment.
Move column left, Move column right
Moves a column of the component list one position to the left or right.
Remove column
Removes the column from the component list.
Rename column
Opens the Rename parameter dialog where you can assign a new name to the parameter. For parameters of certain tabs (e.g. AN_Heating and General) only the column name of the parameter in the component list is renamed and not the parameter name on the tab.
Synchronise
Updates the data listed in the dialog. Use this button, for example, if you have deactivated a floor or trade while the dialog is open and want to update the dialog data. If you perform a calculation while the dialog is open, you can use this button to update the newly calculated component data in the dialog. The calculated parameters are then listed on the new tab (AN (...)). If you have renamed a parameter of a tab and this parameter has already been transferred to the component list, you can use this button to update the column designation of the parameter in the component list.
Settings
Save...
Opens the Save settings dialog where you can save the settings of the component list. You can then distribute these settings as an office default via the Manage user customizations dialog ( ).
).
Load ...
Opens the Load settings dialog where you can load a component list setting.
Show components
Enabled: Selected component types and components are highlighted in the drawing. The component that are highlighted in the drawing and selected at the same time can be edited directly with further commands if required.
Labels
Create ...
Opens the Name of label dialog where you define the name of the label. Then, based on the current configuration of the component list, a label is created and opened for editing. When creating the labels, the parameter order in the label is defined by the column order of the parameters in the component list. The parameter names used in labels are displayed in the tooltips of the component list column headers. The created labels are available in the Label components area.
Parameters
New...
Opens the New parameter dialog where you specify the name of the new parameter. Then the parameter is added to the component list as a column. Once a value is assigned to the parameter, it is added to the Custom tab.
Rename ...
Opens the Rename parameter dialog where you can change the name of the selected parameter. For parameters of certain tabs (e.g. General), renaming only affects the column name of the parameter in the component list and not the parameter name on the tab. If you have already added a parameter to the component list before renaming it, you can use the Update button to add the new parameter name to the component list column caption.
Component
Search <
Clicking on Search < and selecting a component in the drawing highlights the row of the component in the component list.
AutoCAD-Table
In this area you can display the component list in table form in your drawing.
Create <
Opens the Create table dialog where you specify the title for the table. Then you have to define the insertion point in the current view. You can adjust the representation of the AutoCAD table in the AutoCAD dialog Table style via the style Standard.
Refresh <
Copies changes in the component list to AutoCAD tables that have already been created.
Get <
Transfers component lists from already created AutoCAD tables into the dialog.
Excel
As an alternative to editing the component list in the dialog, you can also export the component list to an *.xlsx file so that you can then edit the list in Microsoft Excel, for example. By adding further columns in Excel, you can add further parameters to the respective component group (and thus to all associated parts). By adding further rows, further components are added to the component group. When you (re-)import the *.xlsx file, the changed or added data is written to the components and is thus available, for example, for IFC export or for labeling. You can also use the Excel import to import room log books into building models.
The Data exchange ID parameter of the Custom tab is required for unique identification of the components during data exchange. The values of this parameter are preset with the AutoCAD handles of the components by default. However, you can also use other values to uniquely identify the components, e.g. the IFC_GUIDs or, in the case of room books, the names of the rooms.
Export ...
Opens the dialog Select target file or create a new file, in which you select a destination file or specify the location and file name for the *.xlsx file to be saved.
Import ...
Opens the Select file to import dialog where you select and open the *.xlsx file to import.