Details on Zoning
Information about the Zoning section.
You are here:
Symbols
| Symbol | Meaning |
|---|---|
 | The space is marked as Occupiable. These are regular spaces that can accommodate people and are heated or cooled. |
 | The MEP space is not marked as Occupiable. These are usually shafts that contain, for example, sanitary pipes. |
 | The MEP space is redundant in the model. |
 | The MEP space is unplaced. The room is in the list of MEP spaces, but is not placed in the model. |
 | Symbol for a zone or area to which MEP spaces can be assigned. |
 | Symbol for a standard zone or area. If no zones or areas have been defined in the project yet, all rooms are assigned to this zone or area at the beginning. |
 | Symbol for a zone or area to which MEP spaces can be assigned. |
 | Symbol for the building levels to which the rooms are assigned fixedly. |
 | Symbol for a building part to which MEP spaces can be assigned. |
Levels
If you select this view, all MEP spaces are displayed sorted by levels. If rooms are already assigned to a zone, the names of these zones are displayed in brackets after the room names.
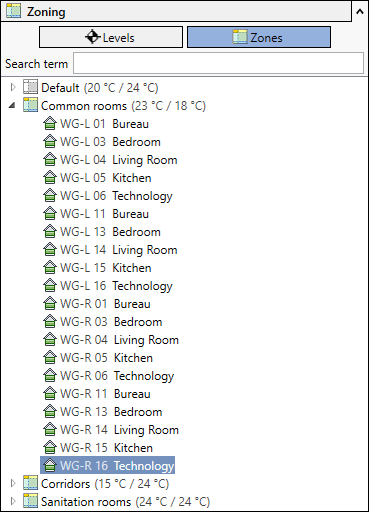
Zones
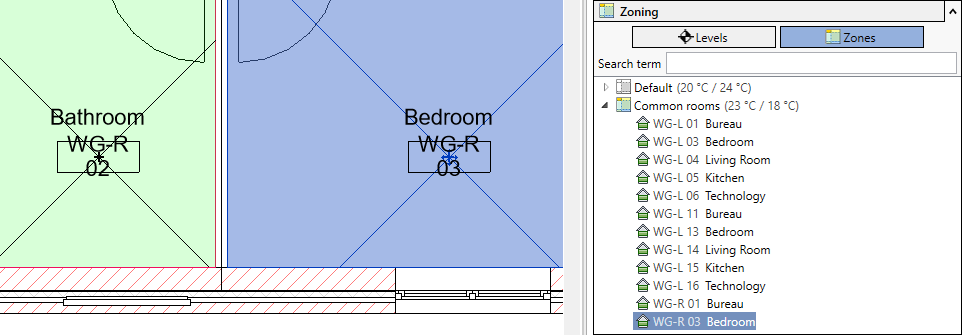
When you select this view, all MEP spaces are displayed sorted by the zone type you selected in the drop-down list. Selecting a room highlights that room in color in the model. The selection of a zone creates a colored marking of all rooms of this zone in the model. You can also make a multiple selection of layers and spaces. The selected elements are displayed in different colors to illustrate their position in the model.
Zone types
Drop-down list
In this drop-down list select the zone type according to which the spaces should be grouped. In the Configure zone types dialog, you specify the zone types that will be displayed in the drop-down list.
Configure zone types 
Opens the Configure zone types dialog. Here, in addition to Zones and Apartments/zones zone types defined for the model appear. You create additional zone types using key or text parameters in component lists. These are then available in the Configure zone types dialog and can be used in zoning to group rooms. In the zoning, you can then classify the rooms into the zones based on structural parameters. Examples of structural parameters are Room type, Room automation, Usage unit or Net room area according to DIN 277. Assigning a room to a zone assigns the underlying attributes of the zone to the room.
Room/Zone overview
Shows the overview of zones and spaces according to the selected zone type. The rooms are arranged into the individual zones in a tree structure. The rooms can be moved to other zones by drag and drop or by using the context menu and the selection of Move to. When you select a zone, that zone appears under Other in the Revit Properties window.
Context menu
Right-clicking a zone or a MEP space opens the context menu:
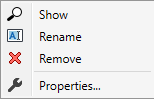
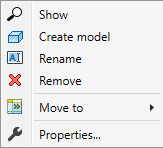
Show
Zooms and centers the space or zone in the floor plan view.
Create model(only for MEP spaces)
Creates a 3D volume body describing the space geometry; useful for troubleshooting modeling or visualizing spaces.
Rename
Activates the edit mode for the selected space or zone.
Remove
Removes the selected space or zone (also from Revit's own room list).
Move to(only for MEP spaces)
Opens a list of existing zones and zone templates of the currently selected zone type. Here you can move the selected space into a zone. Assigning a room to another zone also assigns the underlying attributes of the zone to that room. By selecting an option under New zone: you can create a new zone for the selected zone type and move the space to it at the same time. However, this option is not available for zone types of the Key type.
Join zones
If you have selected the Zones entry in the drop-down list and marked two or more zones, you will get the Join zones option in the context menu. This command allows you to join the selected zones in the zone from which you called the context menu.
Properties
Opens the properties dialog. Depending on the selected elements, the dialog offers different setting options.
Search term
Allows filtering rooms into levels or zones. If you enter a search term, only the rooms whose name contains this search term will be displayed. You can, for example, filter out and display the bathrooms of all layers and assign them to a zone via the context menu. If you remove the search term from the input field, all rooms will be displayed again.
You can also use regular expressions as search terms. For example, you can search for all toilets and bathrooms to group these rooms into one zone.
The following table provides examples of using regular expressions.
| Search with regular expression | Search result |
|---|---|
| Toilet|Bathroom | Displays all rooms with the text |
| [WLA] | Shows all rooms whose name contains the letter W, L or A. |
| ^M | Shows all rooms whose name starts with the letter |
| [0-3] | Shows all rooms whose number contains one of the digits 0, 1, 2 or 3, for example |
| ^Storage\s\d | Shows all rooms whose name contains the text |
| ^Storage\s\D | Shows all rooms whose name contains the text |
| 1. | Shows all rooms whose name contains the digit 1 and any following character. |
You can also use regular expressions to search for rooms that do not meet the specified search criteria. You can also search for several search terms at the same time.
For more information about regular expressions, see the common sources.