Details on Ports on Body
Information on the Ports on body tab in the Tank dialog.
On the Ports on body tab, you define the ports that are attached to the tank body.
You are here:

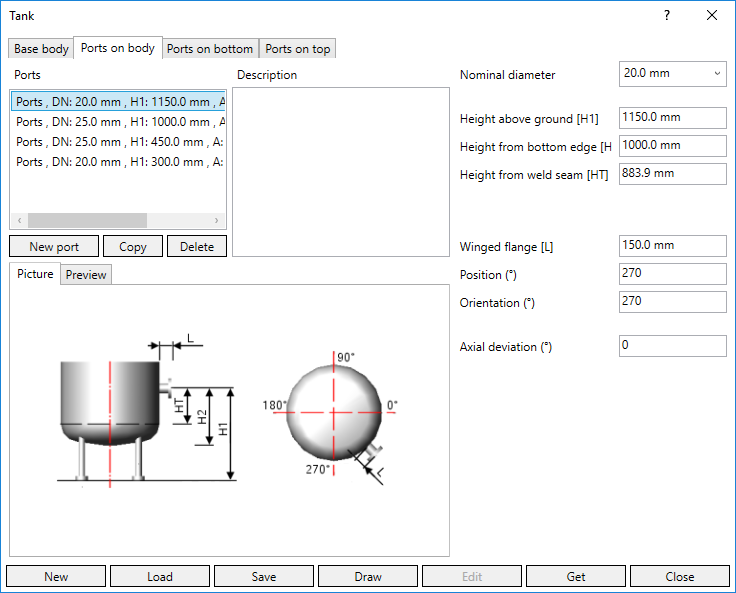
Enter the dimensions of the ports in the right part of the dialog. Which dimensions are to be used can be seen in the illustrations on the Picture tab. If you want to check the effects of an entry, switch to the Preview tab. Click the Refresh button after changing the settings.
Selection list Ports
If you have created ports, they appear in the list and can be selected and edited. If the list is empty, no fields for the ports data are displayed.
New port
Creates a new port that appears in the selection list. Then the data of the port can be entered.
Copy
Copies the currently selected port in the selection list.
Delete
Removes the currently selected port in the selection list.
Description
The description is stored with the tank data and is used to distinguish between several ports.
Nominal diameter
Select the nominal diameter of the port from the drop-down list.
Height above ground [H1]
Lateral view: The distance from the top edge of the floor to the axis of the port.
Height from bottom edge [H2]
Lateral view: The distance from the bottom edge of the tank bottom to the axis of the port.
Height from weld seam [HT]
Lateral view: The distance from the weld seam between tank body and tank bottom to the axis of the port.
Winged flange [L]
Distance from the tank body to the end of the port.
Position (°)
Top view: Enter the Position of the port at the tank body. The tank is viewed from the top. 0° corresponds to the position on the right, 270° corresponds to the position at the front.
Orientation (°)
Top view: Enter the orientation of the port in relation to the tank body. The tank is viewed from the top. 0° corresponds to the orientation to the right, 270° corresponds to the orientation to the front. The orientation may differ from the position.
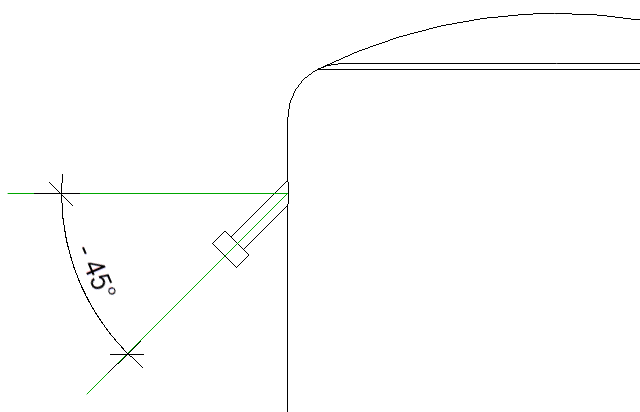
Axial deviation (°)
If the port is to be attached vertically to the tank body, the axial deviation is 0°. If the port is to be inclined, enter the axial deviation. If the port is to be inclined downwards, enter a negative value.
Example:

New, Load, Save
 New
New
Creates a new tank if you have previously loaded a tank or changed settings.
 Save
Save
Saves the current tank configuration.
 Load
Load
Loads a previously saved tank configuration.
Draw
The family is loaded into the project and you can place the component in the model.
Edit
If you have previously shown the data of a tank in the Tank dialog using Get and have changed the family, all instances of this family contained in the project are changed using Edit.
Get
If there is already a tank family in the model, all data of the tank is displayed in the Tank dialog by clicking Get. You can adjust the data and save the changed tank family or transfer the changes to all instances of this family contained in the project by clicking Edit.
Close
Closes the Tank dialog. The entered data is saved in the dialog until you close the program. The data is also available in other projects.